Wednesday, June 18, 2014

I opened up my shop on Etsy!

What's New....I opened up my shop on Etsy. https://www.etsy.com/shop/CraftyLittleDesigns

In this shop, for now, I am only selling die cuts from dies made from recycled aluminum soda cans. Great for cards, scrapbooking, and crafts. If you like my die cuts and are interested in a die, please message me as I have lots of them for sell. Thanks for stopping by.


Friday, June 6, 2014

Rethinking......

Sorry everyone, but my website is down. I haven't done very well this past year and want to rethink the direction I am going. I need to think of something that is different. I have been exploring with different thoughts and have come down to a few different ideas. For starters, I need to find a new website host as my last one I was not pleased with it at all. I am going to start creating some templates and making some videos to share with everyone. I have lots of ideas of crafts up my sleeve. I just need to find some time to create them.
My husband has been building a tree house and play set for the kids in the back yard and I'll show you the cool things I have planned for decorating it. However when it is 110 to 120 degrees outside this summer, none of us want to be outside, unless we are in the pool.
As far as crafting and hobbies go, I like to do it all and dabble in all sorts of things. I like paper crafting, quilling, paper mauche, decoupage, sewing, needle point and drawing with every type of media.
I would like to take you on an adventure of what my family I like to decorate. I would love to offer you awesome detailed dies and stamps to add to your collection. So my journey is changing and I hope you follow me through my journey.

Friday, February 28, 2014

Cutting aluminum can with dies.

Have you ever experimented with cutting different materials?
Well, I have been curious. As a Graphic Designer at Dies Direct, I see lots of different uses for the dies and requests on people asking if a die will cut what they need it to. So, here is what I am doing....I am going to experiment on my own, with what my dies can and can't cut. First up on the list, Aluminum can.

You might say, a can going through a die cutting machine, that won't work. So, don't be silly, I am cutting the can first. First, I stabbed a hole along the top neck of the can with a little peering knife, because it is my sharpest knife. Once I had a hole made, I put in my scissors and cut off the top, then down the spine, and around the bottom.

It really was easy to cut, I used kid scissors actually. Now I came to the conclusion that the can is round, how can I flatten it? So I put in the eBosser to see if it would flatten it. it didn't work, this was as flat as it got after a few times in the machine.


I just went for it, I put the die on it and put it through. I tried it without the 'E' plate, first because I wasn't sure if the can would cause too much tension. You really only need the right amount of tension to be successful, to much tension to often will break your machine. The final outcome was that no E plate, didn't work. So I tried it again with the E plate and wow it worked.


 The die cut was more vibrant and sturdier than a paper cut. I fell in love right away. I just had to cut them all and see what will happen. The butterfly here has pierce points and they did pierce.
 I am so excited to show you all this fantastic crafting idea. An aluminum can. You could really emphasis your card by showing them they are a real Squirt or you have a Crush on them.
 Perhaps, even use a beer can.
 What will I cut next.......stay tuned..........

Wednesday, October 9, 2013

Another round shelf project or two or three.....

Hi. I had gotten four of these round thick cardboard things from my work. I painted two of them purple for my daughter and two of them green for my oldest son. While I showed you what I did with the first one, I finished a second one and started on the two for my son.
 This time I cut a bunch of strips of paper, roughly a 1/4" wide and I used my fancy cutters, switching up the type of cuts to add a variety.
 Using my quilling tool, I rolled up a bunch of these and let them loosen out to different widths, to add variety. I glued the tip of the paper and let them dry before adding them to the shelf.
 Here I made a quilled flower about 3" big and added some rinestones and one of my Crafty Little Designs butterflies to the top of it.
 I made a second flower, and since it didn't glue very well to the shelf, I placed two of my Crafty Little Designs Spiral flower die cuts behind it.
 On each of the sides, I added a bow, a Crafty Little Designs Flower Flourish die cut and a clip of some decorative paper. My husband creatively decided to place a flame-less candle in the shelf making it glow up really nicely.
 For my son, I had to try to think of some way to decorate it with out flowers and butterflies. So I cut strips from my cardboard like paper and wrapped them around at an angle. since the strips didn't quite fit all around, I added a nice wide area of just the paper to close them together.
 For his other one, I created a checker board effect. I cut a sheet the same width as the shelf, then I measured it into four equal parts. Since my paper strips were still the 11" length of the page, I just cut them down inch by inch, surprisingly only needed to use three sheets.
More to come with Andrew's shelves. I don't have a hot glue gun yet, or had the chance to run over to the craft store and buy one. Once I do, I will be placing some old hot wheels on these with other decor.

Tuesday, September 10, 2013

Really Awesome Homemade Shelf for $0

While being a mother of three young children, the newest being only two months old; I like to find cheap and fun things to do. I really don't like spending money and love creating things. While I am running my own company, Crafty Little Designs, working full time at Cheery Lynn Designs and raising a family, it was really hard finding some time for a project.

What you need:
Dies, which ever theme of a decoration your aiming for
All kinds of pretty decorative paper
Random broken pretty things ( I have these once were shower hooks butterflies
Ribbon
Fishing wire thread
Paint
Glue, all kinds of glue depending on heavy duty you might need
Wall Braces, about two for each shelf
Something for a shelf, how about really thick cardboard circles(like I'll show you)

At work, as it is a manufacture of dies and other metal things like signs and photometals; we get in a lot of packing materials.
Something comes on these big circles made of really thick cardboard. Well I asked and took a few home.

Here's a look at the finished project:
 I started off with some paint I actually picked up for free when Ace Hardware was giving away a quart of free paint. I went in and got a purple , then my husband when in and got a green. I've been using these paints on more than one project. It comes in handy getting your kids favorite colors.
 Then I cut a few strips of different ribbons and a hole bunch of dies, in all different papers. I assembled some flowers using the brads and they easily pierced through the ribbon to hold them on.
 With the thread....I used a needle and pierced through the butterflies and tied them off. Then on the front of the shelf, I sewed it to the ribbon, while on the back, I sewed it into a tiny piece of scrap paper and then glued the paper to the back of the shelf. Making sure the paper was small enough not to show past the edge.
 I used Epoxy to glue on the big broken butterflies. For everything else, I used Martha Stewart's clear craft glue.
All along the top half of the circle shelf, I used my four Crafty Little Designs dies, for sale at craftylittledesigns.com.
I added embellishments throughout.
Hope you have fun making something out of nothing.

Saturday, August 10, 2013

I'm Back!

Hi fellow crafters. I have taken some time off from pushing forward with my business, to bring my newest addition to the family in to this world. I had my third child on June 24, 2013. His name is Ian Robert Wallace. His middle name is after my father and his first name was a just a last minute decision. He was the most difficult of our children to name. But he is the cutest and most handsome baby I've ever seen. He is so content and doesn't cry nearly as much as our children.

I am now finding some time to work on designs, projects, getting a design team together and more.

Stay tuned......

Wednesday, May 29, 2013

Fourth of July Chipboard container

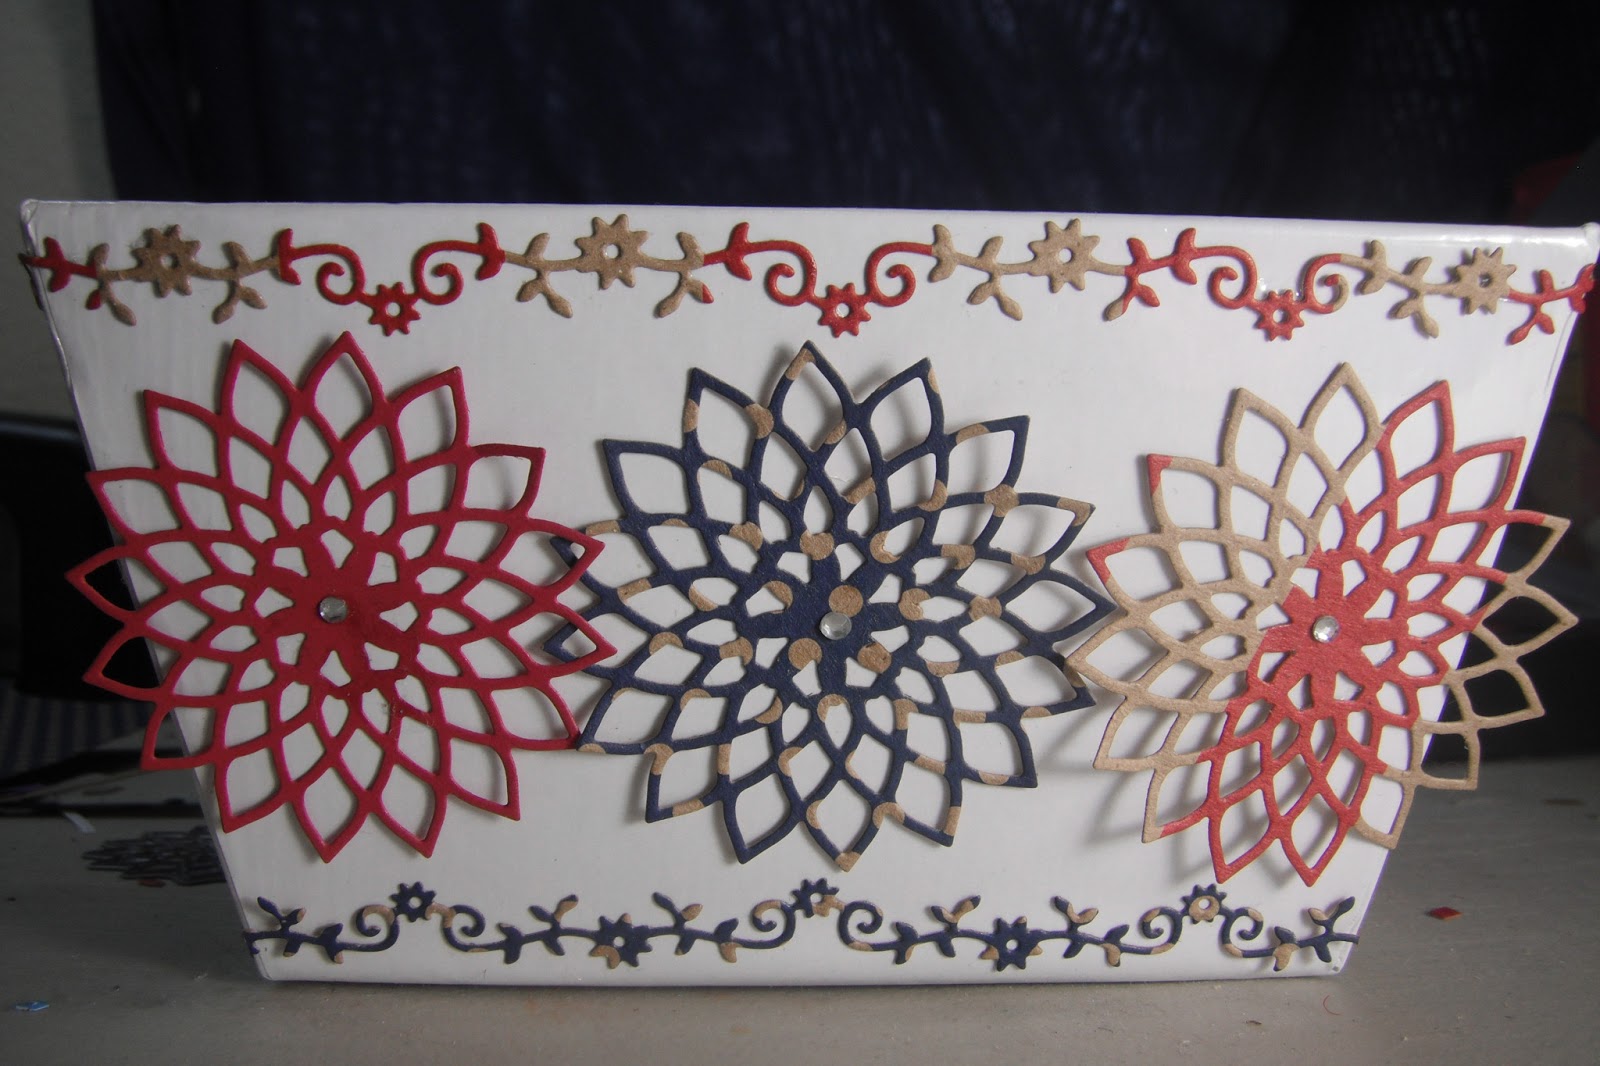
I purchased a $1 Chipboard Container from Target in their little $1 section in the front of the store, it's always filled with craft ideas and fun little things for the kids. I took my Crafty Little Designs Spiral Flower die and Flower Border die, and some flag like themed cardboard paper.
I discovered that using a cardboard like card stock, does not allow the die to emboss it.
On the side of the chipboard container, I lined the borders along the top and bottom. The great thing about this border is that even if you trim it or just connect different strips together, it always works and matches nicely. I glued the three different Spiral Flowers along the center, adding a little jewel to add some extra flair.
On the sides of the container I put the three different papers on top of each other to create a different effect. As with the border, I wrapped a full length of the border from the front and back around the corners to the sides. I then clipped the border in a different color to match up nicely along the top. As for the bottom border, I clipped them on the stems, rather than the swirls, still having them match up with the next border.
This is a nice little craft to make for a napkin holder for your 4th of July BBQ, or make a different one for each utensil, fork, spoon and knives.